This week has brought a new project to the shop along with a new tool that I have needed for more years than I can count along with the selling of a tool I never used. This all started actually a couple of years ago when my Brother-in-law decided to move and get rid of his shop. Or at least down size it a bit I am really not sure which it was anymore. Anyway he had a really nice jigsaw that he no longer wanted. I picked it up for $100 and thought it could be something that would be good in my shop. Wrong. I never found a project in the three years that I owned it that I needed to use it. I never even fired it up to run it.
Here is the scroll saw that I cleaned it up and ran for the first and only time in the shop a few days ago. I put it on Craigslist and sold it in about an hour and a half. Really only 1 1/2 hours! It was a very nice tool but the wrong tool for my shop. I got my $100 back that I paid for it and was not sorry to see it go.
Here is the new router and router table that filled the empty space where the scroll saw used to be. It took me a bit of time to get it all put together but I am happy to say that I am very pleased with the new tool especially because it is exactly what I need for my current project.
This last Christmas season while I was doing some shopping I came across a small table that you would use when sitting on your couch so that you could either work on your laptop, eat dinner or whatever. This is my version of that table.
The one I had seen last Christmas was not much different than the one you see here other than the fact that it was made of metal and painted black. I liked the idea and the table looked ok and all but the price was over $100! I knew I could make something that worked just as well and did not even come close to being that expensive. So another project was born.
I have all of the wooden parts cut out already and have even gotten most of the parts edges routered(?) using the new router table. (It worked great by the way.) So in a few more days I will be putting out the next post showing the assembly of the table and hopefully have it stained and varnished also. The table is made out of clear pine that I will stain either oak or cherry. Not sure which one yet and then varnish. But the images of the table above are exactly how the table should look when completed. It will stand 26" tall, 20" wide and 16" deep. This will give me a good table top size for whatever I plan on using it for. The legs are tapered so that they will easily slide under my couch when I sit and watch TV while having dinner say. I'll post more about this project just as soon as I get it pretty well wrapped up and some photos taken of it. Have a good day in your shop. Today was one of the better days for me in that regard.
I am happy and proud to introduce to you today my newly created character puppet "Dexter". I posted several weeks ago about the Stan Winston School Of Character Arts where you can learn how to make everything from monsters to Muppets. I have always wondered how the Muppets were made and as I am more of a Muppet kind of guy than a monster maker this was a no brainer in my book to take the class presented by BJ Guyer. I had an absolute blast making Dexter and so I thought I would put together this post telling you a bit about the class and how he was created.
Here's "Dexter"! This is the very first and certainly not the last Muppet style puppet I will create. I learned everything about how to make him from the video training that I received from the Stan Winston school online. Well worth the time and I have several other classes I want to take that are related to puppet making and performing as well as some that have nothing to do with puppets at all.
This is BJ Guyer who taught the Muppet making classes. Before I get into how the class went and some of the construction of Dexter here is BJ's info that will fill you in a bit more about how talented this gentleman is.
BIOGRAPHY
BJ Guyer has served as a puppet builder for The Muppets’ Wizard of Oz and puppeteered on Muppets from Space. He was also a coordinating producer and puppeteer on “Crank Yankers,” and has performed in a variety of other projects including Team America: World Police, “Between The Lions” and “The Book of Pooh.”
Most recently, he is a co-creator and lead puppeteer on MTV Flux series “Videogame Theater” and puppeteer and puppet builder for several commercials including Nike’s MVPuppet campaign, Boost Mobile, Grocery Outlet and Trace Adkin’s music video “Brown Chicken, Brown Cow.”
I want to let everyone know that I have never made a "Muppet" in my life and after taking this enjoyable class I highly recommend that you follow my lead and also take the class. It is not rocket science. The class to make Dexter was easy to follow and simple to create what "BJ" was teaching. Just like being in the room with him as he takes you step by step (or maybe by the hand) and shows you how easy and simple a Muppet character can be created. The photo above is one of the first steps in making the hands. All of the templates for making a Muppet are included with the class so there is no guess work. The main parts of the puppet is made from ordinary 1/2" foam. I picked up what I needed from my local Walmart store in their craft isle. In the photo above you can see the two hands that I traced and cut out of the foam. Below the foam hands are the wire skeletons that are mounted inside. It looks difficult to make but it really is simple once you learn how.
The hands are glued together with the skeleton inside and the edges are glued and pinched together to form a nicely shaped hand when done. In order to hold the hands to the arm and then to the body a shoe lace is attached to the wire framework as shown in the photo above.
The arms are nothing more than more foam glued together on the long sides to form a tube. In the photo above you can see the shoe laces sticking out of the ends where it will attach to the body of the puppet. The arm is glued to the hand at the wrist and then pinched to secure the contact cement. On the lower hand in the photo above you can see a portion of the pocket that is installed into the palm of the hand so that the rod to animate the arm can be mounted into the puppet.
This is a good start on the head of the Dexter. The wide opening in the front is where the mouth will be located. You can see all of the seams that were created when the head was glued together. Again with all of the templates included with the class it was a no brainer to follow along and get this rather complicated looking piece put together. I was a bit leery at first wondering if my puppet would turn out half as goods as the one BJ was showing how to build. I am happy to report that my thoughts about failing this classes were unfounded.
Here's a couple views of the head with the mouth in place. Already you can see a lot of how a Muppet is built by just these two photos.
I started playing around in Blender 3D with ideas I had for a face for Dexter early on in the construction. The character on the far right could be a frog easy enough. If the eyes were held up on supports then you could have an alien. The center character looks more like a standard Muppet character but nothing really makes him stand out. The last character struck my fancy with the goggles and the little black eyes.
With all of the work I had done over the years of designing and building things on my 3D printer the goggles were the right choice for me. Here is what Dexter looked before I painted the goggles. The blue fur really was a great choice too.
Here's a nice close up shot of Dexter with the goggles I hand painted and mounted on his face. The dots of his eyes are nothing more than the felt pads that you use on the bottom of chairs to keep them from scratching a floor. They already have a sticky back on them so it was a simple process to position or reposition the eyes to get the look that I wanted.
Here Dexter is completed all except some clothing that I had not picked out for him when this photo was taken and some hair that I want to use to finishing him off just a bit more. As you can see from this posting I have not gone into every little detail involved in making Dexter. That you can find out more about by taking the class as I did. I am still learning how to make Dexter come to life so to speak as I have only seen photos of Muppets and now I actually own a real one that I can play around with. I know my grandson will go crazy over Dexter and so I have a couple more characters at least that I have in mind to put together to go along with him so the fun has just started.
With all of this in mind I have also put together a short little video (shown below) I call "Dexter's Screen Test". It was a good way for me to see what it takes just to shoot the video and learn how to make Dexter come to life. This little video was a major undertaking and already I have learned that operating a Muppet takes a lot of practice and effort. I give the real Muppet artist a big thumbs up for their mastery of this form of entertainment. So with that in mind please let it be know that this is the very first time I have every tried something like this. No matter what I am having a ball with the process and it looks like I will continue in the weeks, months and years ahead. Enjoy the video!
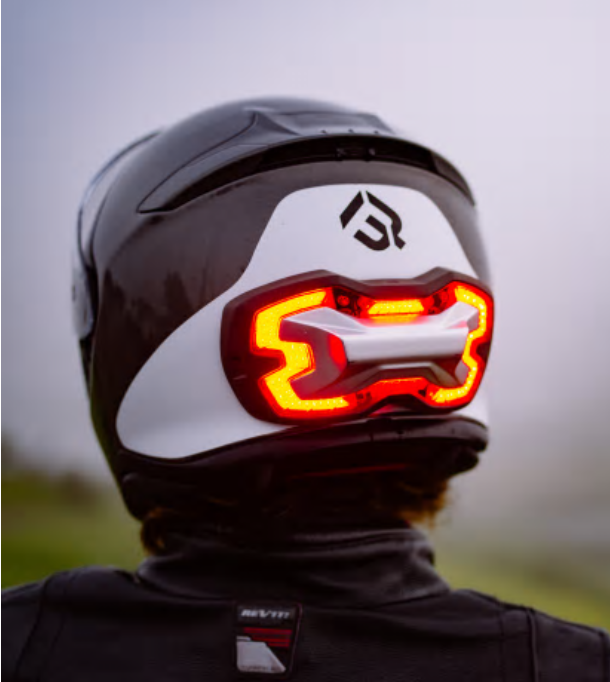
This morning I received an email from the team who are at this moment crowd funding a new product called BrakeFree. This project that has already reached it's funding goal is now coming close to ending it's campaign. The product that will come to market in the coming year is an autonomous brake detection light that attaches to the back of a motorcycle helmet. This idea is not something totally new but then again is because of the features that have been designed into the BrakeFree light.
The BrakeFree light is held magnetically to the back of a standard motorcycle helmet. It has a rechargeable battery for all day riding. You simply remove it from your helmet and plug it into a charger using a micro USB cable.
The helmet is programmable, lightweight, weather resistant and aerodynamic. There are 100 individual LED's in the unit for a nice bright display that will surely be an attention getter while in use.
The BrakeFree has a battery life of 8+ hours. It takes only 2 hours to recharge and has no wires or apps to make it work. Another plus is that the unit weighs only 6 ounces or 170 grams. Very light weight for the size of the light. The BrakeFree has three modes of operation. Regular braking, engine braking, and emergency braking. Even with this capability the light will not come on if you bob your head up and down to try and turn the brake light on. A nice bit of engineering I would say.
The light is held to a helmet using two magnetic mounts. I thought about this for a second the first time I saw BrakeFree online and was wondering what happens when you have a passenger on your motorcycle and you want to use this on your ride. The passenger would have brake lights in his or her face? No. What you do is have another set of mounts put on the passengers helmet and the unit will work exactly the same way giving you and your passenger a safer riding experience. Also being as the unit is so light weight the passenger would not even notice that the light was on the back of the helmet.
I for one am a big supporter of this new Indiegogo project and so I wanted to spread the word to other riders that this crowd funding project will be ending soon. I enjoy riding my motorcycle a great deal and with this product I will feel just a bit safer and secure knowing that I will be seen when I am traveling down the road and need to stop.
BrakeFree as I said earlier in this post has already reached it's crowdfunding goal to get this product on the market. With only eight days left they are trying to expand the capabilities of the BrakeFree light to let everyone have a larger battery in the unit that will give it 2 hours more battery life or 10+ hours total battery life. Of course with helping fund this project the cost of the unit is less than it will be once the crowdfunding campaign has ended.
The Brakefree campaign lists the price of the unit at $119 which is at a 25% discount compared to what it will cost once the campaign has ended. The price goes up from there depending on how many units you would like to order.
It will take almost a year for the BrakeFree to be available but as with anything new that comes on the market it always takes time to get all of the fine details worked out. For more information about BrakeFree and have a chance at helping crowdfund it's success further you can find the link to the BrakeFree campaign listed below. I know I am happy to have helped and will look forward to getting one of these units in my hands as soon as possible. Check it out today!
I spent a good portion of today checking out the Madison Wisconsin Maker Faire. I was not disappointed. I only live around an hour and a half from Madison so it was and easy drive on my motorcycle. Being as the temperature today reached 82 degrees it was a no brainer to make the trip with my bike.
The event was huge in many ways. I arrived shortly after 11:00 am and already everything was in full swing with more projects, booths, displays, and spectators that I even anticipated. Lots of usual things were at this maker faire like 3D printers, craft items, and activities for kids, but what caught my eye was the varied interests that makers had brought to the show along with the skill level that came with them.
This boat was one of the outstanding displays that I saw at the show. I did not get the full details about the boat other than the fact that it was five feet long, is fully R/C controlled, has twin electric motors to power it and was hand built over two years time. The boat is of a plywood construction with a fiberglass hand built hull. An amazing piece of work for sure.
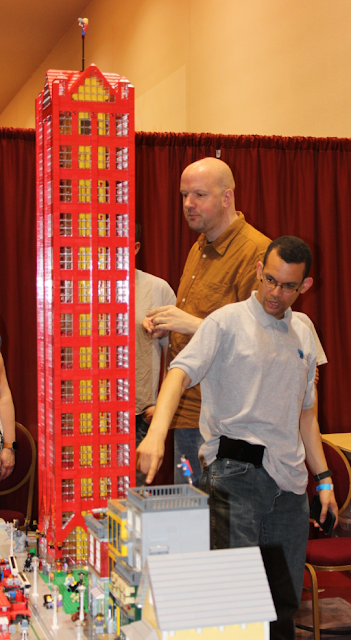
A few steps away from the boat model was rather intricate display of Lego building. The top two pictures were of a complete town with an operational model railroad. All of the buildings were put together using nothing but Lego blocks. None of which were glued together. Another nice bit of work. I like the skyscraper with all of the windows.
Also at the Maker Faire was this very nicely constructed Iron Man suit. It was nearly complete and was very well done.
Also another big hit at the faire was of course this working replica of the Star Wars R2D2 droid. I spoke with the owner and he said that it took him two years to get R2 looking and operating as well as he did at the faire. R2D2 was completely R/C controlled with all the correct sounds and movements that R2 would make. I was lucky enough to get this photo as there was at least a dozen people around him all day long.
Not to be outdone was this interesting little R/C robot/dinosaur running around on the floor. The operator (namely an 8 year old) could move the robot all around plus also make it's head reach out and bit something. It was fun to watch and I am sure much more fun to play with on the floor.
This is just a small sample of what I had seen at the Madison Maker Faire. The number of booths that were at the show would have taken me a couple of days to talk to everyone to fill you in on all that was shown. Sadly to say the Maker Fair was only for one day.
I did manage to talk to some very interesting makers while I was there. On young lady who is a school teacher was helping her 3rd grade students learn about architecture. There school this year had just celebrated it's 100th anniversary. So the class build a simple model of the school and even tracked down that actual blueprints for the building to get everything correctly scaled. Impress once again.
The best suggestion I have for anyone who did not have the chance to go to the maker faire is to mark your calendar for next year to see it all first hand. I am sure with the turnout from this years show that next years will be even bigger and better. It was well worth the time to spend at least a couple of hours seeing the wonderful creations that were on display and meeting some of the creators in the process.
Through the winter months I put together all kinds of things that I only get to test out or play with once the weather is more conducive to being outdoors. Case in point is todays project that I got to test out just yesterday. The warm weather has finally arrived here in the Midwest and with it a large grin on my face returns after I get to ride my Goldwing motorcycle having been stored for many months in the garage. To the point here....
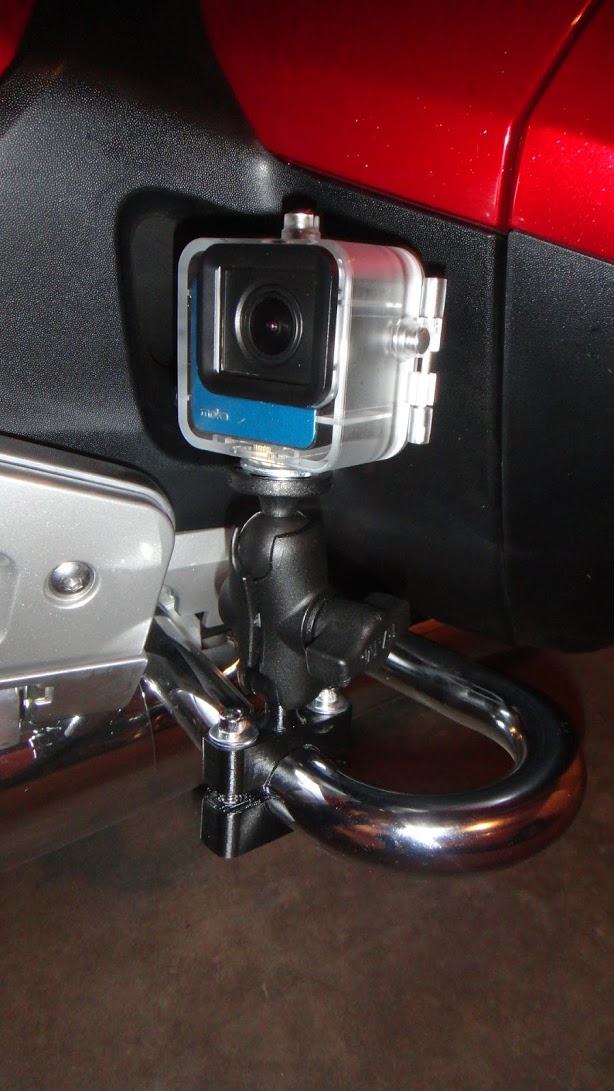
I picked up a small action camera called a Mokacam some time back and this called for a special mount so that I could get some video shot while riding my bike.
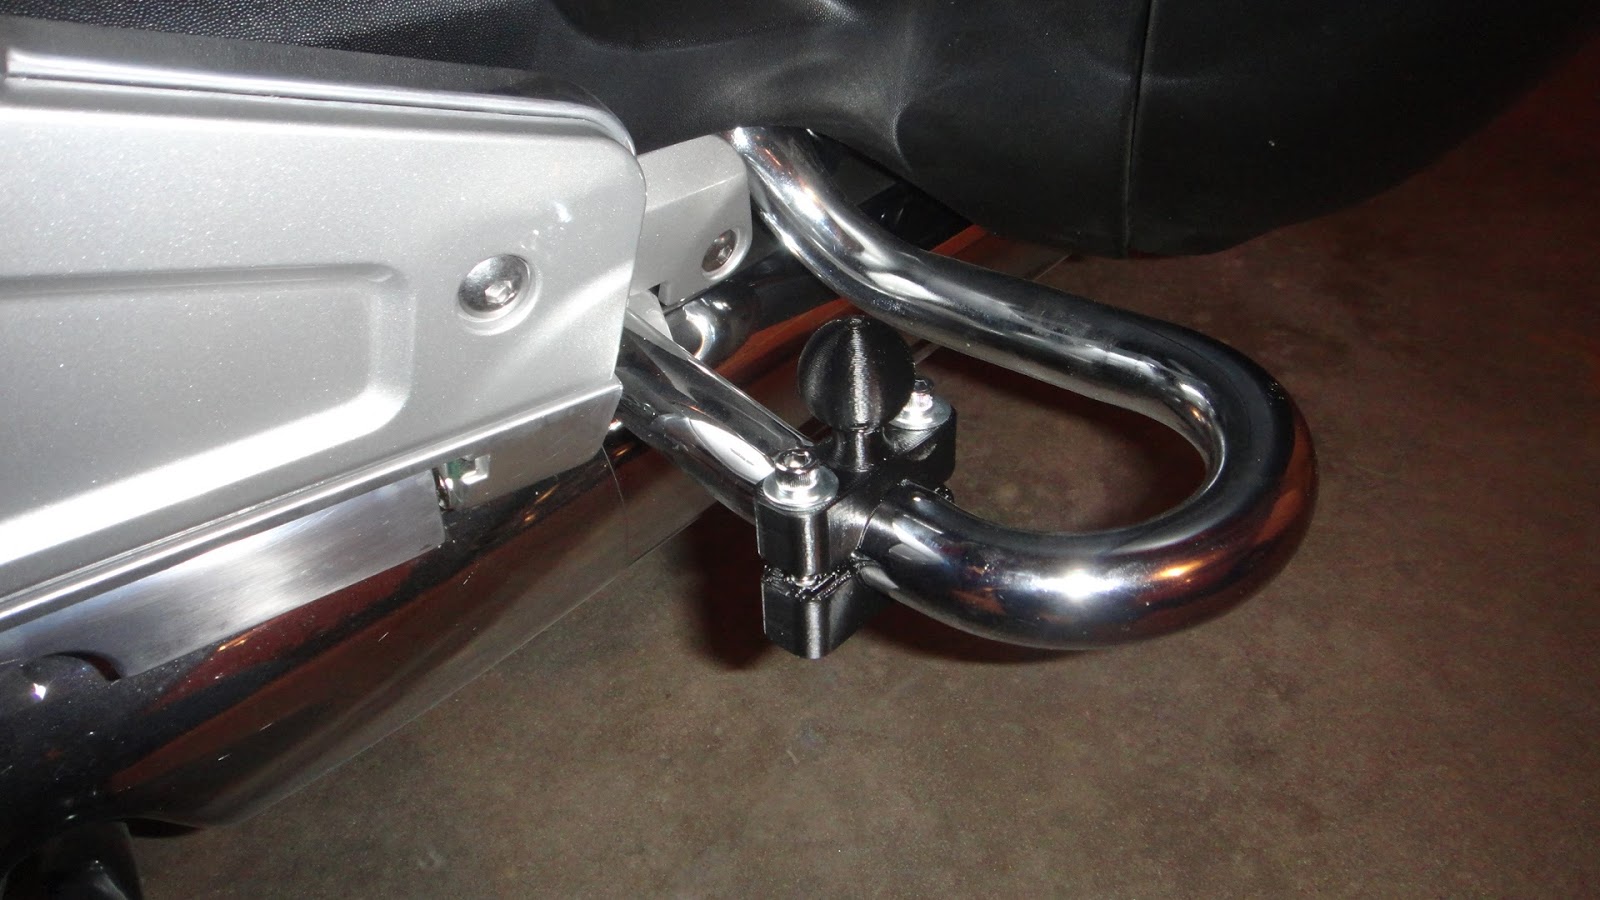
I have posted several other projects that needed a special mount or tripod for the Mokacam (shown in the photo above on the right). On the left is the special mount that I 3D printed so the little 4K camera could be mounted to my Goldwing. The part in the center of the photo is the connector that ties the camera to the 3D printed mount by a simple threaded rod with a twist knob on one end of it.
Here is a good shot of the mount on my Goldwing's rear saddle bag guard. The mount is simply held in place by screwing together the upper and lower portion of the mount with chrome plated hardware the holds it securely in place around the guard when it is in use.
Here is the complete assembly with the camera in place ready for use. I also added a safety line to the mount (not shown) when I shot the test video. I did not want the chance to loose the camera for some reason as I thought it better to be safe than sorry. The way the camera is pointed in the photo above would be a good view for video but had to be moved to the outer most point on the guard so the camera could be pointed to the rear for the video that I shot and is shown below. I also mounted the camera up on my handlebars as well as on the front engine guard so that I could get several different camera angles for the video. The only thing that I needed to make the video even better was to have a camera mounted onto another motorcycle and shooting me on my bike. That will have to wait for another day.
Overall I was very happy with how the video turned out as the little Mokacam lived up to the promise of great looking video. The mount work perfectly and was very solid and smooth. The only thing that was not so good was the audio. The little camera picked up a ton of wind noise so the audio was unusable. This really did not matter to me as I never intended to use the audio but rather wanted to add music to make the video just a bit more interesting anyway. The "Goldwing Song" came to mind from the start and so it was a good choice for the video. If your not into the song just turn down the audio and enjoy the scenery.
Here's the complete video. It's only around four minutes long. Enjoy!
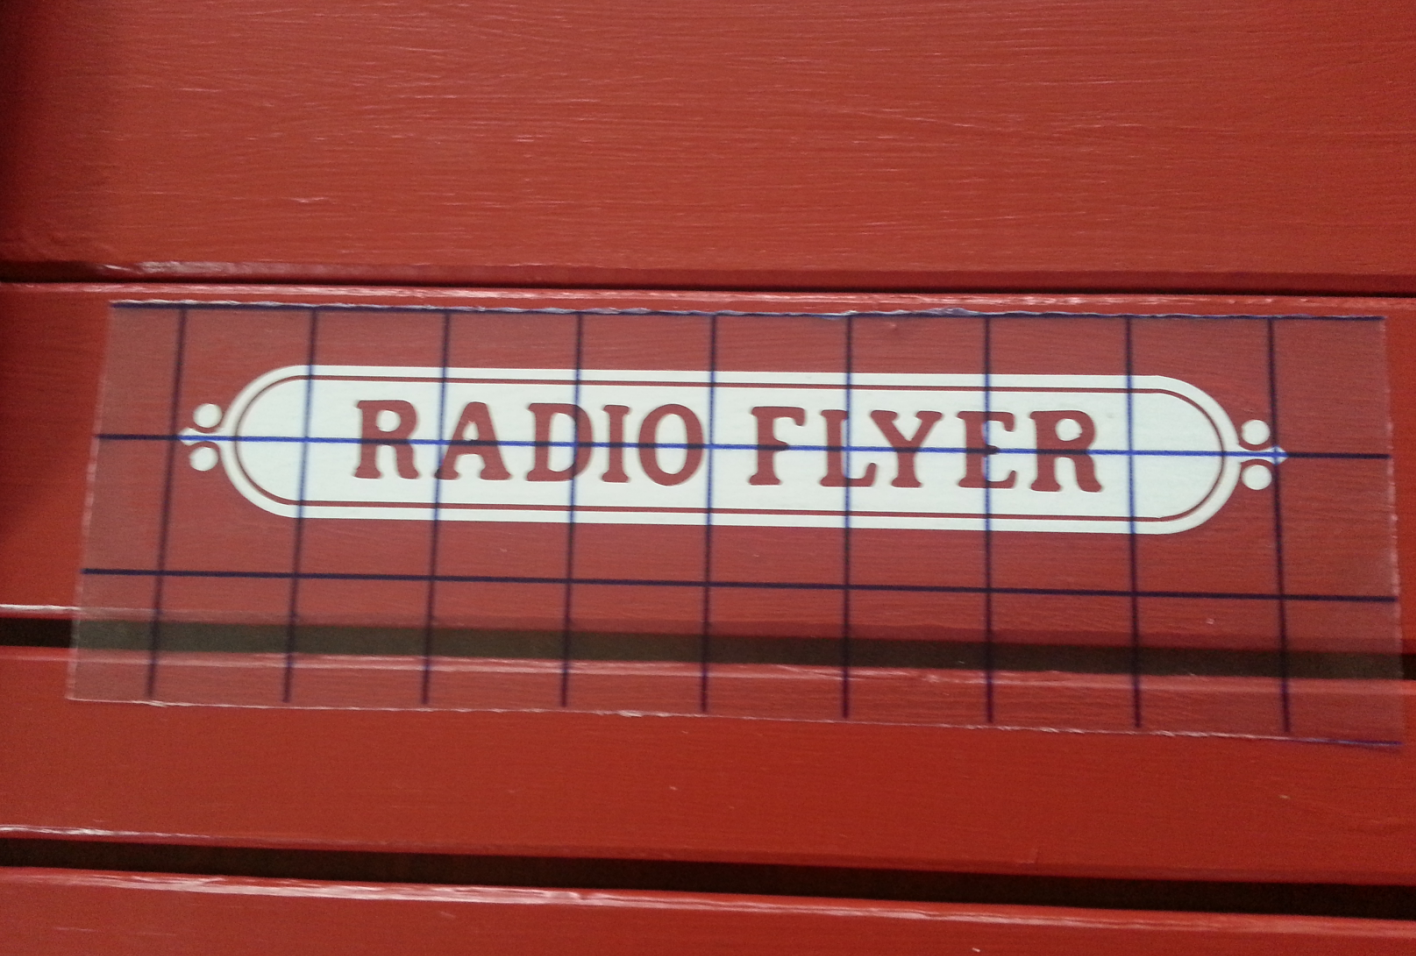
A couple of weeks ago I posted about making some vinyl decals for my sister Velma who lives in Tennessee. She had been working on restoring an old Radio Flyer wagon that had been sitting in her garage collecting dust, dirt and anything else that wanted to crawl into the wagon to call it home. After taking the wagon apart and repainting all of it's parts she still needed the finishing touch to complete the project. Namely the " Radio Flyer " decals that adorn the sides of the wagon. I spoke to her at the time and started looking for the correct decals from the company. The wagon was so old the decals no longer were available. I told her that any company that did vinyl graphics for cars could duplicate the decals for her but I was also sure that they would not be inexpensive. At that point I got to work figuring out how to cut vinyl decals of my own and offered to make them for her once I had worked out the bugs to the process so to speak.
To review a little bit, here is what the original Radio Flyer painted logo looked like on the wagon before Velma did any prepping for painting on the project. With this image I was able to make a drawing to create the new decals that she needed. This was the simple part being as the tape measure in the picture gave me the information to get the dimensions at least fairly close to what was originally painted on the wagon.
I got the decals cut with a little effort and shipped them of to Tennessee. That was a couple of weeks ago. Being as all of this was new to me as far as making decals and even applying them I had to relay instructions on to Velma on how to put them on the wagon without messing them up in the process. I crossed my fingers that my instructions were enough to have things work out for her project.
The transfer tape that I used for the decal already had a grid printed on it so it made things simpler for Velma to align the new decal when she was ready to apply it. She simply had to place the decal on the wagon side and then use a credit card to press down on the transfer to squeegee it firmly to the part she was working on.
Then it was just a simple matter of peeling the transfer tape off of the part to leave the vinyl decal in place afterwards. The transfer tape is sticky enough to hold the decal but not so sticky as to remove the decal once it has been pressed into place using a credit card. Best description I can give you as to how sticky the transfer tape is? Something as sticky as a "Sticky Note" would be.
Here is the finished wagon that Velma can be very proud of. She had applied three coats of clear over the paint on the red parts of the wagon to seal the vinyl decals in place. This should insure that they will stay put for years to come and have to be sanded off the next time the wagon should ever need to be refurbished once again.
She and I both learned some new things along the way and had some family fun in the process. The one person that will surely appreciate the restoration the most is Velma's grandson who will surely get many hours use out of a wagon that had been neglected for many years but now has been lovingly restored to like new condition once again.
Smiles and bragging rights are well earned with the completion of this project. 😀