Tuesday, April 25, 2017

Learn How To Make Monsters to Muppets From The Stan Winston School Of Character Arts!


I watch a lot of different video presentations online about making things and I was fortunate enough to find something that I am very happy to have come across.  I was watching a show on YouTube called "Tested" with Adam Savage from "Mythbusters".  


On the show one of Adam's co-hosts  Frank Ippolito  and George Frangadakis (creator of Immortal Masks) were touring the 2017 Monsterpalooza convention in Pasadena California.  At this convention were all kinds of artwork, sculptures, make-up demos, and masks from monster movies and the people that make them.  I am really not into movie monsters but it was still quite interesting to see the creations that were at this convention. (See the video link above)  During the video I got to see everything from monster masks to movie make-up being applied to an actor to a full sized alien from the movie Predator.  The one big question that stood out in my mind while watching this video is "How does anyone learn how to create this kind of stuff"?   I got my answer ten minutes into the video.  Frank brought up the fact that people constantly asked him how he learned to make the different creations that he had built in his shop for himself and other people or companies.  He pointed them to a booth at the show and said "Start here".   At that point I paused the video and wrote down the name Stan Winston School of Character Arts.  I then went online and did the research about this amazing site and what you can learn from it.  Here is what I found.


The site has over 100 different video classes that you can take to learn about making everything from Monsters to Muppets!  I have been looking at the site for almost a week now and knew that I had to pass this information along everyone so that you could expand your knowledge on designing and building new projects.  I have my eye set on at least a half dozen different techniques that will be a big help in projects that I want to work on in the future.


In this posting I have images from the Stan Winston site. Sorry you will have to go to the site in order for the preview to work.  To give you a bit of history though before I go any further I should explain who Stan Winston was.  This is a good description of him and what his life's work was about that I found online.

Stanley "Stan" Winston (April 7, 1946 – June 15, 2008) was an American television and film special make-up effects creator. He was best known for his work in the Terminator series, the first three Jurassic Park films, Aliens, the first two Predator films, Inspector Gadget, Iron Man and Edward Scissorhands.He won four Academy Awards for his work.


Winston, a frequent collaborator with director James Cameron, owned several effects studios, including Stan Winston Digital. The established areas of expertise for Winston were in makeup, puppets and practical effects, but he had recently expanded his studio to encompass digital effects as well.


In this posting you can see some of the classes that are available on the Stan Winston site.  Everything from creating a monster in your garage on a budget to how to airbrush.  Airbushing artwork has been on my mind for a lot of years so this is on my to-do list from this site. 


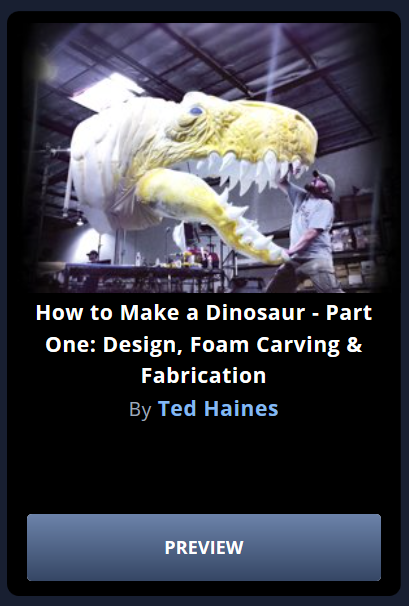
I was very impressed with the different classes that are offered from the site.  The image above looks like it would be interesting as all get out to make a dinosaur that is full size.  A challenge to be sure but with the classes that are offered it would be nice to have the experts walk you through the process.  Not sure what I would do with a full sized dinosaur but you just never now.  Maybe something that would be great for a decoration for my front lawn during Halloween.


Here's another class that I could have used on a couple of my projects years ago.  I find it a difficult task to paint something to make it look like metal when it isn't metal at all but either plastic or fiberglass.  One more  class to put on my to-do list.


The list continues to grow as I go through the Stan Winston site again with this class on learning how to make characters similar to the Muppets.  I have always wondered how they managed to make the creative and fun characters from the show.  Now I can learn it myself.


For those of you into monsters this is the site for you.  There are more classes than I can count on how to draw, design, sculpt, and create monsters to your hearts content.  


One more class on my list is this one on Stop Motion Animation.  I have played around with it over the years and I know the principals of the craft but never went as far as learning how to make the characters for a video.  My to-do list gets bigger and bigger the more I look at this website.


With all of the information that is available from the Stan Winston site I was pleasantly surprised at how affordable the classes are.  Here is a the breakdown of the different payment plans that are available for the 100+ different classes.


Here also is a listing of the different types of web courses that are available so there are some good choices to make if you are by yourself (like me) or a group (like a maker space). 


I am in no way connected to this school.  Not that I would not jump at the chance at getting the opportunity.  I just want to pass this information on to you so that you might find something that you've always wanted to learn but never could figure where to get this kind of education.  So when you have at least an hour or so check out the sites listed below. I'm glad I found this site as it will offer me a lot of fun and interesting subjects to study in the coming months. 

For those of you who want to have access to video training by the masters of character creation here's the link to the Stan Winston site.


Here also is the link to the Adam Savage "Tested" Site


Saturday, April 22, 2017

Find Older Projects Faster With Nine New Blog Pages!

The last few days I have been going over the layout of my blog and have come up with nine new pages so that everyone can find older projects easier and faster.  The pages are broken down into different category's  to make finding projects simpler.  Here is the full list of the new pages.


Designing

Miscellaneous Projects

Blender 3D Projects

Woodworking Projects

CNC Projects

3D Printing Projects

Fiberglass Projects

Drawing Projects

Miscellaneous Blog Posts


Pick one of the category's (Shown above is one project from 3D Printing Projects) and in it you will find a listing of all the posts that have been done on the blog about that project.  Also where it has been possible I've included a photo of the project from that category so you can find what interests you even faster.  Under the photos are links to all of the posts that relate to the project.  Select a link and it will take you to the post about the project.  Much faster than trying to find what your looking for from the date listing on the blog. 


The new pages can be found on the blog home page as illustrated in the image above.  Enjoy!

Tuesday, April 18, 2017

Learning New Processes To Make New Things

I learned a few new things over the past couple of days while working on some projects for myself and my sister.  I own a piece of equipment called a " Tooli " made by Toolbotics.com from Australia.  For those of you who have never heard of a Tooli it is a machine that does a number of things rather well.  It's a plotter, a vinyl cutter, an extruder, an air brush machine just to name a few of it's capabilities.  This week I have been trying to figure out how to have my Tooli machine cut vinyl decals.  I have never worked with this type of material but always felt it would be fun to be able to design and make decals for the projects I build.  So this was the plan for this week.

To explain what I had in mind or should I say what my sister Velma had in mind was that she needed a set of decals for a restoration project that she is working on.  She had come across an older Radio Flyer wagon that she decided to restore.  It has a wooden platform instead of a steel tub and wooden side rails with the name " Radio Flyer " printed on them. The restoration of the wooden parts did  not come without a challenge but the Radio Flyer name on the sides would be gone if she repainted the wagon. So decals would have to be either purchased or remade.  I did some research for her only to find out that the original design and font for the name was no longer available.  So I decided that I would try and see if I could make new decals for her.  It would help her out and get me started in learning how to make decals too.


Here's the what the original Radio Flyer artwork looked like before restoration had started.  My sister had shot this photo as reference for me so I could get the scale correct for the project when I was setting up the new decal. 
From the photograph I was able to create a new drawing for the decal using Corel Draw software.  A simple process of tracing over the original photo to get what I needed.  I tried to find the correct font for the lettering but could not track it down online so I manually had to trace out each letter to get what I wanted.  Again not a hard or long process.  With this step completed I figured I was pretty much home free. This was not the case. 


I had never even seen the hardware used to make vinyl decals until I purchased my Tooli machine.  It was all new to me and I did not have a mentor to instruct me on how to set everything up and get what I wanted made.  Case in point is the strange looking device that is pictured above.  This is actually the vinyl cutter for my Tooli machine. It is only a couple of inches long and believe it or not the blade that is inside of it is sticking out of the rounded off end on the right of the picture.  It took me weeks to find out any information about how to make this little gadget work and set up properly to be able to make vinyl decals.  
  Inside of the device is a VERY small blade that protrudes out of the end of the hollow center of the cylinder. The blade is adjusted using the knurled brass locking ring and knurled aluminum adjustment knob.  The blade only sticks out of this cylinder a very small distance.  Get this..... It only sticks out half the thickness of a credit card!  I'll give you a link at the end of this post to show you the procedure for that one.  
  Anyway after working with the blade mount for a bit I did get it set up correctly and was encouraged to move forward and try and make some decals. 

I didn't want to try and make the wagon decals starting out as I thought I should try something a lot less critical as my first attempt at making decals.  So I decided on this image of Snoopy.  I wanted something fairly simple to make that I could put on just about anything I wanted.  If I couldn't get it to be cut correctly out of vinyl the first time I could try again until I got my machine dialed and or I figured out what I was doing wrong in the first place.  


I lucked out right out of the box and here is where the decal landed. This is my sketch book that I use while working on projects and being as it has a totally white blank cover Snoopy was the place for it. Now I thought I had it made when it came time to create the decals for my sister's wagon project. 

Wrong again.

I got my files together for the cutting of the wagon decals only to find out that my "Tooli" machine was now acting up.  Things were not setting up nicely as it had when I create the Snoopy decal.  I contacted Toolbotix and by this morning I had gotten the answer to my hardware problem with the machine.  I had an adjustment out of whack with the machine and after ten minutes everything was back in order once again. Whew!


I ran the files to make the Radio Flyer decals and here are the results.  They turned out better than I had hoped.  Not flawless but for a first attempt at something this detailed I am happy with the effort.  The photo above would be similar to looking at the decals from around six inches away.  Considering that you will look at the decals from probably at least five or six feet away these will do nicely for the wagon restoration project.

  So with the making of the Snoopy and Radio Flyer decals I learned how to correct some minor problems with my vinyl cutter/plotter if they should happen again and how to design decals in the future that will be cut more accurately which in turn will be easier to clean up when the decal is set up to be transferred from the cutting table to the finished project that it will go on to. So lots of new lessons learned this week. 


Here are the links from Toolbotix.com and USCutters.com

Info about the "Tooli" machine.

How to set up a vinyl blade holder.


Tuesday, April 11, 2017

Planet Express Stealth Ship Blender 3D Inspiration

As most of you already know I am a big fan of the TV show Planet Express made by Matt Groening the creator of the Simpsons.  I've created a previous lighted display of the Planet Express spaceship weeks back when inspiration hit me. This again was the case this past week while watching another episode of the show playing on my Roku.  In the episode the Planet Express crew needed to save the world by flying a small one man stealth spaceship to destroy an invading death sphere spacecraft that was headed for earth and destroying planets along the way.  Professor Farnsworth the 180+ year old that is always inventing crazy things builds a one man stealth ship to be sent out to destroy the invader.  


I liked the design of the little stealth ship (shown above)  so much that I thought it would be a great project to try and model in Blender 3D as if it was a real spaceship and not just a cartoon.  Shown also in the image above are the complete cast of the Futurama show.  Starting on the right going left is Dr. Zoidberg (kind of a crab like alien), Bender (a girder bending robot), Hermes (the bureaucratic accountant for Planet Express business), Philp J. Fry ( a delivery boy from the 20th century who is now in the 30th century), Leela (Planet Express's pilot/captain and Amy Wong  who is standing behind Hermes (an intern to Professor Farnsworth).  Professor Farnsworth is standing on the platform just above the stealth ship.  To the left of the spaceship is Zapp Brannigan (wanna-be space hero).  Also pictured to the left are two secret service agents and the head of Richard Nixon in a jar.  You'd have to see the show to understand that one for sure.


(Click on the image above to get a full screen view)

Here's the end result of my efforts to recreate the stealth ship in Blender 3D.  I was originally going to only model the spaceship just by itself and thought I would go a bit farther with this project and put the ship in the hangar as shown in the original picture.  I also included Bender the robot with the ship just so I could give it some scale and as Bender was another good subject to try and model I thought it would work out nicely.  I did not count the number of hours I spent working on this latest creation as I was more concerned with getting everything  to look the way you see here rather than bother about it.  Bender himself was a challenge to get his features set up to match what is shown on the show so I was happy with my efforts to come very close. 

As for the stealth ship I got several different images by shooting them with my DSLR directly from my TV screen.  The one thing I noticed after reviewing the images was that the stealth ship kept changing in the episode of the show.  I did not notice this while watching but it sure showed up while comparing all the photos side by side.  I put as much detail into the small spaceship as I could and then worked with the little details that I could see within the hangar itself.  After I was satisfied with that aspect of the modeling I kept playing around with different lighting until I was happy with the scene.  The end result turned out very well so it will hold a place of honor in my Blender portfolio  along with the rest of my creations that I've put together  over the years.  Thanks for checking out my latest Blender 3D effort.

Friday, April 7, 2017

Motorcycle "Fast Glasses" Project Is Dialed In And Completed!

I was happy to find in my mailbox yesterday the smaller Neodymium magnets that I had ordered about a week ago.  I did not expect them for at least another week.  So with a happy grin on my face I got back to work on refining my motorcycle "Fast Glasses".  For those of you who just found this post and have not seen the previous news I had posted about this project I have been working on designing and building an easier way to wear glasses when I ride my motorcycle.  I cannot wear contacts and do not want to get eye surgery but I still wanted and easier way to wear glasses when I had my helmet on.  To put my regular glasses on once my helmet is on is a hassle to say the least and after a couple of hours riding become uncomfortable on top of it all.  So this project was born.   The idea was to design a new set of glasses mounts that hold the glasses to the helmet instead of my face.  Here is the final design.


All of the plastic components for the glasses I designed and made on my 3D printer. The glasses are held into my helmet using Velcro mounting straps and in turn the glasses are held securely into the mounts using very small Neodymium magnets.  The glasses are standard prescription glasses that I had set up for my eyes without any arms on them so that they could be mounted to the side frame mounts using small wire clips that I bent into shape by hand.  These mounts also hold mating Neodymium magnets that allow me to quickly and easily put on or take off the glasses after I have put on my motorcycle helmet.


I went through several different designs of the "Fast Glasses" to get the bugs worked out of them.  On the design previous to the final one I was happy with the mount (shown above on the left) worked but was to thick and caused an effect when driving like having "Blinders" on.  Distracting and not good at all.  I went back to work and refined the mount to use the smaller (1/8" x 1/8" x 1/2") Neodymium magnets which did the trick.  The new mounts (shown above on the right) are only 1/4" thick now and with no "Blinder" effect when wearing them.  The new magnets are also plenty strong as each will hold a pound of weight.  More than enough to hold my glasses in place while cruising down the road.


Here you can see my happy face as I model the new specs with my helmet on.  I worked on a few minor changes to the mounts all day yesterday and finished up with what you see here this morning. The glasses are very comfortable and are solidly mounted inside the helmet now instead of being smashed against my face when I am wearing them with the helmet. It takes me less than a second to put the glasses on or take them off so I've succeeded in accomplishing what I've set out to do.  With no "Blinder Effect" now I'm all set to do some comfortable cruising instead of some uncomfortable cursing as I go down the road. 


Wednesday, April 5, 2017

New Pages Added To The Blog!

I got a brainstorm during the middle of the night about the blog and thought it would be a great idea if it was easier for everyone to be able to see some of the more interesting videos that I've put together over the years.  These videos cover a large variety of projects that I've designed and built and also some tutorials on using Blender 3D modeling software. So with this idea in my head I got to work this morning and added a couple of new pages that will help everyone to easily find the videos faster.  The two new pages are titled "Tinker's Workshop Project Videos" and "Blender 3D Tutorial Videos".  As with all the videos that I've posted on the blog if you'd like to see a large view of the video just click the YouTube icon and it will pop up for you.  The image below shows where you can find the new pages so enjoy!


3D Printed Action Camera Chest Mount Project

I picked up a small action camera similar to a Go-Pro some time back on Kickstarter and in the process have been thinking up ways to use it.  This in turn pointed me in the direction of how to mount the camera to things like my motorcycle and of course myself.  My action camera is called a Mokacam and shoots in 4K and only cost me around $100. The price was right and it was a few steps up from a Go-Pro so I just had to have it.  The only drawback with the mounts that I found for an action camera was that almost all of them are set up for a special mount that only a Go-Pro uses.  Useless for my little camera.  The Mokacam uses a standard camera mount that you would find on a regular camera and a good camera tripod.  This actually made things simpler to design a chest mount for the camera that I thought would be interesting to try out on my motorcycle. 


I originally thought that I would use nylon webbing and plastic clips to hold the mount to my chest.  I wanted to keep the cost down and complexity of the mount as simple as possible so instead I planned on using double sided Velcro straps.  This type of Velcro I had used a long time back and had some small pieces of it laying around in the shop so I knew what I needed.  The Velcro has one side that is fuzzy and the opposite side has the sticky loops that make Velcro work. Pictured above is the setup for the chest mount. One strap would go around your chest and two more straps that would go over your shoulders. The only reason that the straps in the images above are red is so that I could more easily illustrate how the mount looks and works.


The only real task in designing a mount for the Mokacam is to have a small platform that the camera would be mounted to and a way to strap it to my chest.  Pictured above is the CAD design that I came up with.  At the base of the mount is a small hand wheel that holds the 1/4-20 bolt that screws into the base of the camera.  On the back plate are four slots to receive the strapping that would be used to hold the mount to my chest. 


The chest strap is fed through one vertical slot on one side of the mounting plate and then again through a matching slot  and attached to itself on the opposite side.  Sewn to the upper slots on the mount are the two mating Velcro tabs to hold the shoulder straps in place when the mount is in use.  Shown above you can also see where the shoulder straps are sewn to the chest strap at the back. 


This is another good view of the Velcro straps and how they are attached to the camera mount.  The mount was designed so that the camera is positioned far enough away from the vertical back plate to allow the chest strap to easily fit when fed though the mount for use.


In the photo above you can see the actual 3D printed camera mount with the attached Velcro straps already mounted to it.  Next to the mount is the small hand wheel that is used to secure the Mokacam to the mount.  This was an easy part to create.  I designed the hand wheel so that it would hold a standard 1/4-20  half inch long bolt.  The head of the bolt is recessed into the handle to keep it from spinning freely and is held in place with a small amount of silicone rubber so that the bolt will not fall out.


This is how the Mokacam chest mount looks when you wear it.  Rather than see me with the chest mount standing in my back yard or my kitchen I thought it best to show it off in an area where the camera could actually be used.  Thanks to a some fancy photography work and Gimp software the photo is just a bit more interesting.  (I wish this was my real backyard!) Anyway the Mokacam chest mount is easy to put on or take off and works great. It will be interesting to use this summer on my travels. The Velcro strapping I found at my local builders store and I have plenty left over for future projects. Total cost for the chest mount the best I can figure with the Velcro and 3D printing material only came to around $10.   A great price for a nice accessory that should help me make some interesting videos. 

Sunday, April 2, 2017

Motorcycle Fast Glasses An Overwhelming Success But Still Room For Improvement.

I'm finally getting caught up on a couple of projects this week with the arrival of my new prescription glasses for my motorcycle helmet.  This project I posted about a few weeks ago and I was able to test the design and fabrication I call "Fast Glasses" yesterday.  To help those who have not read the earlier post get caught up I have been working on a new setup for my motorcycle helmet which makes it easier to wear glasses when I ride.  The big problem I have when getting ready to ride and even during the ride itself is having to put on glasses as I cannot wear contacts and do not wish to have eye surgery to correct my vision.  To put on regular glasses is a pain both figuratively as well as literally. So with all of this in mind I worked out a design so that my prescription glasses could be attached magnetically to the inside of my helmet. Instead of having my glasses placed on my face this new design allows me to make the process of putting on, wearing and taking off the glasses faster, as well as easier.


This is the design that I came up with for my glasses that I tested.  The glasses are held in place with mounts that are attached to the inside of the helmet using Velcro strips and magnetic mounts.  Attached to the glasses themselves are the mating magnetic mounts to hold the glasses in place while riding.  I was able to test the new setup yesterday and am happy to report that the design works perfectly. The glasses only take about a second to painlessly put on or remove and are as comfortable to wear as not having to wear glasses at all as there are no frames sandwiched between my head and the padding on the inside of the helmet.   For long rides this will be a huge advantage and will make riding that much more enjoyable.  I was also very much impressed by this and the fact that there is no additional vibration or maybe even less vibration than wearing regular glasses when riding.


There was only one flaw that I could find with the design and that is the current problem to solve at this point.  The mounts are very stable and secure but a bit larger than I wanted as it made my side vision kind of like wearing blinders. Not completely blocking my view but just enough to be distracting.  Not a good thing on a motorcycle so back to modifying my first attempt of this design on this project was called for.


I first off tracked down some smaller magnets for the mounts.  The original magnets are quite small already but not small enough to solve the side vision problem.  I did some searching online and found some neodymium magnets that are only 1/8" x 1/8" x 1/2" in size. I have used similar magnets in other projects and they should be plenty strong for the task at hand. This will help a lot in reducing the overall dimensions of the mounts that are on the glasses.  You can see a big difference in the photos above. The new mounts are quite a bit smaller and will reduce the side vision obstruction by one half.  The original mount is 1/2" thick as the new mount is only 1/4" thick.  A vast improvement.


Here's a view of my new glasses with the old and new magnetic mounts on them.  You can see a big difference in size between the new mounts.  The clip that holds the mount on the left side was not trimmed yet in this photo as I only set it up to show you where I am headed with the design.


The top view of the glasses with the mounts show very little difference in size but I am more concerned about the thickness not the width of the two.  There is more than enough room for the new mounts inside my helmet once the glasses are in place for riding.


Here you really can tell the difference in the two mounts.  The new mount is much smaller than the old mount so it should solve my side vision blinder problem rather nicely.  I also have refined the smaller mount further by decreasing the cavity for the glasses mounting arm to eliminate any vibration or slop in the mount.  The new mount feels much more solid and secure with these modifications.


This is how the new glasses will look once I get the smaller magnets installed into the setup.  All I have to do now is wait for the mailman (mailperson?) to deliver the new parts and I'll have everything ready to assemble.  I also tracked down some simple clip on sunglasses for the new Fast Glasses yesterday that work with the new lenses so I will have that covered as well.  I'll post again with final result once I get what I need. But with what I've learned so far it looks like this project will be an overwhelming success! Have a good one.