Wednesday, April 27, 2016

Wedges Mounted, Amplifier Housing Dialed In, And More..... Capt. America Ball Chair Project Part 17

I am happy to announce in this weeks post about the Captain America ball chair project that I finally have completed installation of all six wedges into the interior of the chair.  YEA! 


Here's a good shot of the project with all of the internal wedge shaped pieces finally in place.  A lot of time and effort went into getting the right gaps between the wedges correct so hopefully my work will be done with this portion of the project.  Lots of cutting, measuring, glassing and fitting over and over until I was happy with everything. I am more than happy to move on to some other portion of the project that will be a lot more fun.


In this photo of the interior I started placing paper templates to figure out where I want the lights, light switches, speakers and air vent nozzles to be places.  It was simpler to do this once the wedges had been mounted so that I could sit in the chair and get an idea as to where I want everything to be placed in this portion of the build.


Most everything is mounted in the top three wedges that you see in the photo above. Starting with the left most wedge will be one speaker (large circle) and one air vent nozzle (small circle).  In the center wedge will be mounted the three lights for reading or watching videos if I need more light.  I originally was going to also put the controls for these lights in the center but found out that when sitting in the chair the switches would have been right over my head.  Not a good idea.  So the switch panel was moved to the wedge on the right along with the another speaker and another air nozzle.


As I pulled out the wedges that will have all of the speakers, lights and whatever, the mounts for these wedges now can be seen in the photos above.  The little spool like mounts have an internal threaded rod connector mounted in them so mounting or dismounting the wedges makes the process an easy one.   That's where all of the work to get the wedges spaced and assembled correctly pays off.


The first wedge that I started to modify for the accessories I have planned was the center one I spoke of earlier that will hold the lights for the chair.  Here I have the center hole and three drilled holes for each of the lights that will be mounted marked for cutting on the fiber glass.


I drilled all of the smaller 1/4" holes with my hand drill and then drilled a pilot hole so I could cut out the larger holes. The first light mounted easily first time out. 


Here all three lights have been mounted with very little fuss to get them in and spaced evenly.  Nice to see things come together and progress being made in short order.  These lights will really stand out once I get the wedges padded and covered with material to finish off the interior of the chair.  I really like the look of the finished red mounts.


Next I took the housing for the speakers amplifier and marked out where I wanted to make the cut so this could be mounted.  The simplest way I thought to do this is shown in the photo above.  A little painters tape for starters to lay down a perimeter.


I removed the amplifier cover and taped the original marked square again only making it a half inch smaller all the way around.  With this being done I then would have a lip that the housing would mate up against and not have a chance of a void if I cut it a little off. 
  I took my handy 1/4" drill bit and made holes at each corner and then cut along the tape from hole to hole using my Sonic Crafter vibrating cutter.  A great tool by the way which made short work of this portion of the build. I held the housing over the opening to get an idea how the cavity would look with the housing in place.


So with the opening cut out of the wedge for the amplifier housing I set to work today to get the mounts for the housing squared away.  This was just a matter of printing up mounting blocks that are mounted to both inner sides of the housing. 


Across the back of the housing are two 3D printed bars that will hold the housing in place using 6mm button head capscrews. 


Here is the housing in place mounted to the wedge with only one of the 3D printed bars just to show you how it all goes together.  The bars and the blocks have a gap between them so when I tighten down the capscrews the housing is pulled tight against the inner surface of the wedge and the bar presses against the sandwiched wedge surfaces of the opening.  Simple and it works great.


Here is how the housing looks when it would be mounted inside the chair.  The match up of the edges of the housing and the inner surface of the wedge are as perfect as I can get them so I am pleased with my efforts once again.  This assembly once it has been fully painted and mounted in the chair will be a very nice detail with the Captain America shield badge on the face of the housing.  The housing will be painted Navy blue so it should be pretty impressive when it is completed.

In the next few days I'll work on getting the speakers and ventilation system mounted.  This I have to be careful with as I have to make sure I get everything spaced right and figure out the wiring layout within the chair as well.  Should not be a big problem that I can see.  Just will have to take my time with it.  Should be as much fun as these last couple of days have been placing the first few components.  Total hours on the project now has risen to 362 hours.  A lot of work and a lot of fun too.  More to follow as I move forward.


Thursday, April 21, 2016

A Unique Chair From Airplane Parts!

This morning I received a comment about my blog and my current Captain America ball chair project.  The person who wrote the comment did not give me his or her name so it is difficult for me to say thank you personally.   The point here is that my reader had  said that they enjoyed my blog and has been following my progress on different projects in the process.   The one thing that this reader also passed along to me was a website for the following chair that is similar to my Captain America ball chair.


This chair is produced by a company named Fallen Furniture located in Bath, England and was made using a refurbished 737 engine cowling.  The company specializes in furniture that is built from reclaimed aircraft parts.  Mostly jets from what I can see on their website. I just had to post photos of the chair and info about the site so anyone interested could also see what had been passed along to me.  To say the chair is big is an understatement.  It is 200 cm x 200 cm x 200 cm in size.  I did the calculations and that dimension is 80" x 80" x 80" in size.  BIG!  A very cool chair that you and a couple of friends could sit in all at the same time.  I did not check into the price of this chair or the other products that this company sells but I am sure it would not be cheap.  Impressive but not cheap. 
  The company also produces, clocks, tables, lighting, drinks cabinets, cowling bars, and fuselage wall art. For more information about the products  Fallen Furniture sells check out the link below.


Wednesday, April 13, 2016

Completions, Near Completions, and Modifications........ Capt. America Ball Chair Project Pt. 16

This past week has been just a bit crazy with some major ups and downs with this project.  I had completed making all of the wedge pieces for the inside of the Captain America ball chair project only to find out that I could not get the pieces to fit into the chair!  Then panic sunk in.  Fearing that I had messed up hugely on my mold for the wedge shaped pieces and that I would have to start over.  The idea of having to modify the mold and scrap what I had already created did not sound like a good thing to contend with.  I spent an entire day scratching my head to figure out how far I was off with the mold and how to correct the problem to keep the project on track.  I narrowed it down to an error in the mold being 3/8th's of an inch to large all the way around.  That was the first error.  Then after more calculations I found that no matter what the wedge pieces would have never fit even if I had gotten the mold made exactly the way it needed to be in the first place.  Here's why.


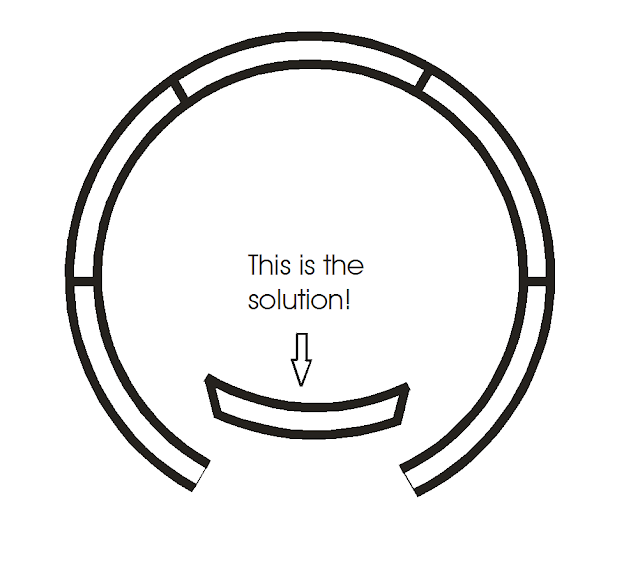
This is a simple drawing to illustrate what had happened.  The ball chair has six inner pieces to the interior.  All of them are wedge pieces like a pie with a flange running around the outer perimeter. Just like a pie.

In this drawing I removed the inner lines that make up these wedge pieces to illustrate things even more simply.  The above image now is a ring that is split up into six equal parts.  Just like the pie shaped pieces.


Now comes the problem.  In order for the inner sections of the chair to be assembled they need to be installed from the outer surface and moved inward.  If you go the opposite direction the wedge or circular piece simply cannot be inserted into the ring or the pie shape as shown above.  In the ball chair the inner wedge pieces need to be install in a way that they will be inserted into the opening of the chair and then moved outward and into their correct position.  This is simply not possible without rethinking the problem and coming up with a new solution.  So I spent a day redesigning the inner wedge pieces so they could be assembled form the inside and move outward.


To correct the problem and not have to remake six new wedge shaped pieces I shortened three of the wedges so that they could easily be installed into the ball chair.  This was an easy task and I solved half of the problem. Next I took the last three wedge pieces and salvaged what I could from them to remake the outer flanges tip inward as shown in the image above.  With these changes I am now able to install the wedges from the inside the chair and move then to the correct outward position.


Here the first three of six wedges have been installed into the chair.  I could start breathing again at this point.


In the images above are the three wedge pieces that needed to be modified greatly to get all pieces of this portion of the puzzle to work out correctly.  I am thankful that I have worked with composite construction as long as I have to solve the issues that have come up with this portion of the build.  Whew!  The wedge pieces at this point still need a bit of tweaking to get the clearances that I want for all the parts to be assembled without further issues. But at least now I can see that I will be able to get all the parts to assemble into the inner section of the chair. 
  It's just a matter of doing some sanding and filling voids to get the pieces the way I want before I can lay fiber glass over the exposed Styrofoam and then remove the foam to be able to mount the last three pieces.   A learning process to be sure.  The big plus in all of this is that now I know how to make a mold and duplicate parts.  So it is not a loss at all.  Just a huge learning session.

Moving forward in another direction on the project I turned to the housing for the amplifier for the sound system for the chair.  The top photo above is the housing already in shape formed with several layers of Styrofoam.  The second photo is the same foam shape with the 3D printed amp mounting plate already fiber glassed onto the foam and prepped with the first coat of primer.  The Styrofoam is still in the hosing at this point.  The third photo show the backside of the housing or should I say the underside once it is mounted into the ball chair.


This next progression of photos shows the steps that I took to remove all of the Styrofoam out of the housing leaving me with only the fiber glass shell left over.  I cleaned the foam out with a hot wire loop tool that cut the foam out like scooping up ice cream out of a container.  Very quick and easy.  Once I had gotten the major portion of the Styrofoam out of the housing I was left with what you see in the third photo from the top.  At this point I simply took a pocket knife and scraped the inner surface of the housing and removed even more of the remaining Styrofoam.  With a little sand paper and ten minutes of time I ended up with the nice clean housing that you see in the last photo.


After the cleanup of the housing was completed I did some sanding on the exterior and drilled the required holes to mount the amplifier inside and the Captain America badge on the outside.  The orange piece in the photos above is the housing for the amplifier and this slid in nicely.  I drilled the mounting holes for the housing so that it can be mounted onto one of the wedge pieces inside the chair. 
  In the third photo from the top you can just see the port for iPod jack on the right side of the housing.  The cable for this port is hanging down just below the amplifier housing.  It took me a little bit to figure out where to drill the hole for this port and still be able to connect everything up inside the housing without some kind of interference.  It all looks good at this point.


I dismantled all the installed parts that were on the amp housing, wet sanded it once again and gave it another coat of primer.  The housing is very close to being ready now for paint.   Ever closer to finishing this portion of the project.


Lastly with this post I wanted to show off the completed switch assembly that will be in the ball chair to control the lights and the air ventilation system.  The panel turned out very well and will be a nice detail that will look good in the chair.  The first switch on the left controls one light and has one dot above it.  The second switch will control two lights and lastly the third switch is for the ventilation fans to be turned on.  Other than the switches this panel and the icons were 3D printed and then sanded smooth and painted separately.  So now it's just a matter of installing it into the chair after the wiring has been set up. 
  So that's about it for this week.  I can let the dust settle for a couple days while I wait for epoxied parts to cure.  I'm happy that progress is still being made and I'm able to work out the problems that have shown up.  Just have to keep plugging along.  With that in mind the weather now is looking better and better each day so I should be able to get at the outer sections of the ball chair to get them sanded, primed and readied for paint outside.   Works for me!  Have a good day in your shop.