Sunday, April 28, 2013

An Update On An Earlier Design

  Some time back I put together a project that I had in my mind for a long long time.  It has been on my refrigerator for just about as long and I am finally updating it to make it that much better.  As with most anyone who works on projects the second or even the third version always turns out better than the first go around. This is the case with this project.


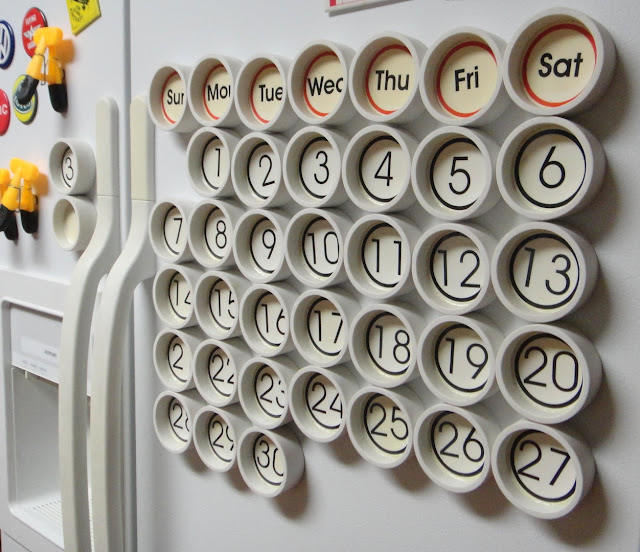
I always liked the idea of having a calendar that I didn't have to throw away after only one year of use.  This is my original design that I put together.  It was made using PVC piping, foam core, and some decals that I printed using my computer and held on the fridge  using magnetic strips.  The only problem with the design was that parts were a lot of work to make and are a little bit heavier than I liked. I had no way of making the parts to display what month it was either.  So back to the drawing board for version two.


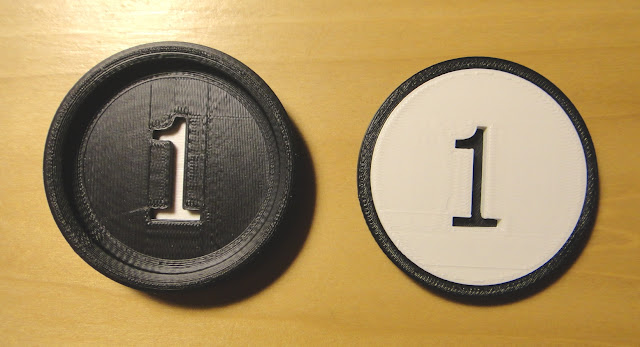
I started with my Makerbot 3D printer once again with the version on the left.  Same idea as the first version but I was not impressed with the part being mostly black.  So I reversed the printing of the part and also made it thinner. Which of course made it lighter.  The white looks a lot better.  It was a start.


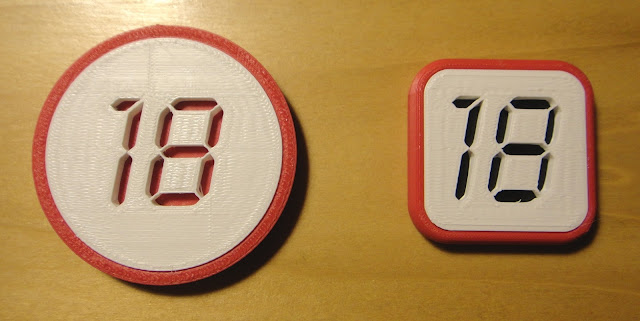
This next version I scrapped the idea of just black and white and also went with a font that would make the number 6, 8, 9, or 0 work out well as the individual numbers were now printed on one white part and inserted into the red part.  Again the idea of having all the parts made circular did not thrill me much anymore so on to the new version on the right.  I changed the part to what you see here with the inner portion of the red frame being painted black.  This made the numbers stand out even more and would be simple to construct. The parts fit tight without having to glue them together. Always a plus.


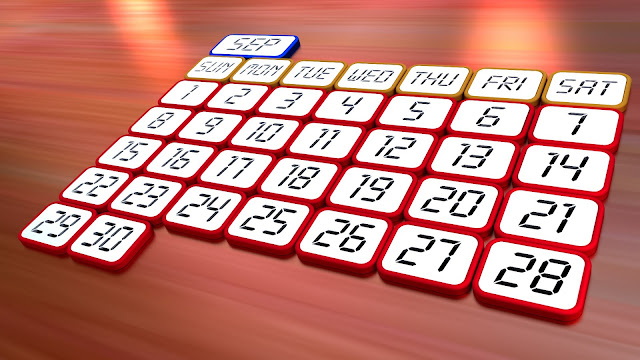
With a few more tweaks and the help of Blender 3D graphics this is what the new design will look like once I get all the parts made using my 3D printer.  Each number part and day of the week will be 2 inches wide and 1 1/2 inches high.  The month (in blue) will be three inches wide and 1 1/2 inches high.  As before all parts will have a magnetic strip on the back so that it can easily be used on my fridge once again.  This way each month the calender can be easily changed to show whatever month it is. 
  The only other step will be to make a container to hold all the parts for storage  when the calender is not on my fridge along with possibly special parts to show holidays when it is.  A heart for Valentines day or a Christmas tree for Christmas for example.  I'll have to see what I can make up that will work on the 3D printer.  No matter what this new design will look a lot nicer on my fridge and people will stop asking me why the month is not displayed with everything else. Another plus with this project is that I figured that the total cost for the calender will be around $20 to make on my 3D printer.  A good deal for sure. 
  I'll post new photos of this project once I get further along with it to let you see how it all turns out.

Wednesday, April 17, 2013

Large Scale Lego Jet Man Completed!


Another marathon session of printing 3D parts on my Makerbot printer over the last few days has paid off with the completion of my large scale Lego Jet Man figure.


In the top photo you can see an actual Lego man standing next to Jet Man.  The regular sized figure is only 1.625 inches tall.  The last photo above shows you how this regular sized Lego man compares in size to a dime. My Lego Jet Man stands 11 inches tall from the floor to the top of the propeller assembly. So he is huge!


This photo gives you a much better idea of the scale difference between Jet man and the smaller Lego figure. 


One of the challenges in printing Jet Man was his arms.  The original design was intended to be a 40 inch tall fiber glass figure and so the computer model needed to be updated so that all parts could be printed on the Makerbot 3D printer.   The arms being such an odd shape had to be carefully tweaked so that they would lay flat on the printer so that they could be made. 


Next was the leg and hip assembly.  In this photo you see this assembly near completion with the left leg yet to be added.  Jet Man  by himself is very complete with legs, arms, hands and head that can be posed into any position. With the jet pack on though Jet Man is limited because the pack needs to be permanently mounted to him.  Maybe the next large scale Lego man can be updated so that the jet pack can be removed.  For now this still makes a great figure and project. 


The fuel tanks for the jet pack are mounted using tabs and slots.  Both the tanks and the back mount have slots that accept mating tabs that are glued into place.  The tanks then are glued on to the tabs to locate them perfectly.  


Jet Man even has a smile on his face.  The helmet which is almost 2 1/2 inches in diameter was glued into place using standard plastic modeling glue.  


Jet Man has only one piece of metal in the assembly which is a  small machine screw.  The seven inch diameter propeller on the top of the figure spins freely with this screw buried inside the upper shaft of the assembly.  The machine screw is hidden by a domed cap that is mounted on top of the propeller assembly.
  To complete the look of Jet Man I added shoulder and waist belts including black buckles. Jet Man weighs in at 13.6 ounces and the cost of materials comes to a grand total of $19.35.  A small price for a lot of hours of pleasure during the assembly and the untold years I will have showing him off.  Speaking of which the total time to print Jet Man comes to 28 hours 30 minutes. Not including around 70 hours design time to figure how to make this guy. Total number of parts for Jet man include 15 pieces for the man and another 25 for the jet pack. Another great and fun project that I am proud to say "I designed and made myself."  I hope you enjoy the photos and the info about Jet Man.


Wednesday, April 10, 2013

Same 3D Printer....Better Design Software.....Better Results!

It pays sometimes to try different things and this definitely is true when it comes to making things on a 3D printer.  I had updated the software that makes my Makerbot 3D printer work faster and smoother weeks back. I thought this actually made my parts better.  What it actually did was make my 3D printer project work load quieter and shorter.  So why had my parts started looking better too?  I found out today while starting work on a project that has been in my computer for a long time.  I dusted off the design and decided to start making parts for it.  Here is what I had it mind before I go further with my discovery.


The images above are what I call the Lego Jet Man project.  I modeled it in software called Pro-Engineering (ProE) quite some time ago and the original idea was to build this guy to the scale you see in the images above.  The taller figure would be me in full scale.  All five foot eight inches of me.  The little Jet Man was originally planned to be made in fiberglass and would stand 40 inches tall when completed.  Until I figure out what to do with such a large figure and how to make the propeller actually move I will settle for a smaller desk version of this little guy.  
  This brings us back to what happened today while starting this little desk top version.  I printed the helmet for Jet Man using the ProE model first.  It turned out ok but was confused as to why after upgrading the software to run my 3D printer I now was getting faceted parts again. Then I used the same file but this time created the file I needed using Inventor software.  This was the reason for the better 3D prints. Here is what the two different models looked like after using my 3D printer. 


The ProE created model on the left and the Inventor 2013 design software model was created on the right. What an amazing difference to say the least. Well worth the little effort to make the better model. So for those of you designing parts for your 3D printer who want to make better parts there are a lot of differences in design software.  So if you can get your hands on a student version of Inventor 2013 (which I own) it will do what you see here and then some and be well worth your time to learn this incredible design software. I use it in all of my projects from 3D printing to fiber glassing projects. 

Tuesday, April 2, 2013

Ipad Stand Version # 2 and The CNC Machine Enclosure Update

As usual here at the Tinker's Workshop I am constantly working on something new or updating something that I've already designed.  This is the case for this week.  My sister Ginnie had seen my Ipad stand that I had printed on my Makerbot 3D printer and liked it so much she wanted one for herself.   I being the kind brother that I am said sure but could not resist the temptation to tweak the design a bit more.  So in doing so I came up with version # 2 of the Ipad stand.


This new design is still small, light weight, and inexpensive to print on my 3D printer but now also has the capability to hold the Ipad in two position instead of just one.  


The first position for the IPad like the first stand is a more upright angle for better viewing while watching a movie or video conferencing.  


This second angle lays the Ipad down at a lower angle which is nicer to type on. A much better angle than what you can get with an Ipad cover that is folded around the back of the tablet.  That angle I have always thought to be a bit to shallow for my taste when it comes to trying to type on the tablet. 


The new stand as I've said is light weight.  Very light at only 3.1 ounces.  It can be taken apart easily if the need calls for it and if one of the parts should break another replacement part can be printed and it ready to go once again.  It measures 5" x 5" and 2.5" tall. My sister already has plans for the stand on how she will use it at her home. 


The CNC Machine Enclosure Update

For those of you that have been waiting for the build of the CNC machine enclosure that I posted a week or better ago do not fear.  I have been cranking out drawings of all the parts for the enclosure and refining the design during the process.  Once I get all the drawings completed I plan on starting the build and shooting video of the process to be posted here.  With the warmer spring time weather we are finally receiving here in the Midwest it is much easier to gather supplies for this project and not have to trudge through snow and cold to do so.  (Can you tell I'm not a big fan of winter?)  
  Anyway I have not abandoned the project but have been putting in a lot of computer time setting up for the build and plans for the enclosure that will be available for sale here once I am happy with everything that needs to be done to prep for the project.  So stay tuned as I will post updates on this and other projects in the works just as soon as possible. It all takes time and I have more projects that no one has even seen yet to work on.  No matter what it is all good.