Thursday, September 29, 2011

The Vacuum System For My CNC Machine Is Up and Working!

After a bit of work this morning I got the vacuum system for my CNC machine up and running.  The parts for the vacuum mounts were designed by David Steele who also designed the machine itself.... The Solsylva.  


The parts are nothing more than wooded pieces that I had made on the CNC machine a few days earlier and some plastic pipe from the plumbing department at Lowes. The black piece is the plastic tube that came with the shop vac hose that I had bought for the ceiling mount.


The small plastic pipe is mounted into the foot of the vacuum with epoxy resin.

 Then the parts were painted and a plastic skirt was added to the foot.  The skirt is nothing more than a section of plastic cut out of a two liter pop bottle.  This pop bottle tube slid on the vacuum foot with a little elbow grease and some slippery dish soap.  It is VERY tight so it is on to stay.  No problem.


All the parts are now combined to make the complete vacuum setup. It stands just about 12 inches tall at this point. 


A series of cuts are made into the plastic skirt so that it is more flexible.  It curves inward naturally and looks really good at this point.  I like the fact that it will keep the cutting dust from flying all over the place and you still can see the bit when you are using it.


Here the vacuum foot is installed on the CNC machine.  A hose clamp is all that is needed to hold it into place as it is very light weight and does not move once it is mounted.  The black screw just above the foot on the white plastic tube is a quick mounting screw for the foot and skirt so that it can be remove or installed easily for bit changes without having to remove the extension tube. 


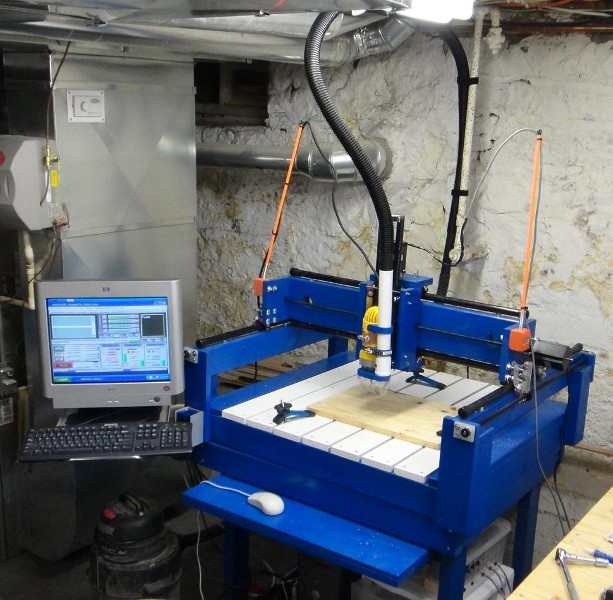
The vacuum system is connected to a standard shop vac hose that is mounted to the ceiling and the wall behind the CNC machine.  The black piece of tubing that I spoke of in the first photo in this section slid into the white tube easily as it is tapered.  All I had to do was slid it in until it I got a snug fit.  That's it. Then all I have to do is plug my workshop shop vac into the other end of the hose and it's ready to run.  I fired it up and it draws air in nicely with the vacuum skirt just touching the part I needed to cut out and form a good barrier and vacuum chamber for the setup.

Saturday, September 24, 2011

My CNC Machine Is Making Real Parts!

  Over the past couple of days I finally got up the courage to try and make some real parts on my CNC machine.  I am already amazed at what I've been able to create in such a short time. The first parts are a simple little display box for a very small bottle of ketchup.  The parts for the box I modeled in Pro Engineering (ProE) software so I thought it would be a good little project to get my feet wet using the CNC machine. I ran the first parts at only a cutting speed of ten inches a minute. I thought this was safe enough for a first go around until I realized that this machine has much, much more capability.  See the explanation and photos below.  


This is the parts that I made for the display case for the little bottle of ketchup. They all turned out better than I had hoped but each piece took me over 20 minutes to make.  This being as I was only running the CNC machine at a very slow speed.


This gives you a good idea how small this bottle of  ketchup really is. It stands only three inches tall and holds 2.25 oz of ketchup.  Should be a nice little display for my kitchen with a small sign on the display case that reads "IN CASE OF EMERGENCY BREAK GLASS". I'll post more photos once I get the project all together.


Now for something really interesting.  The rectangular part in the lower portion of this photo is one of the sides for the little ketchup bottle display box.  It took over 24 minutes to cut on the CNC machine. The larger part in the upper right of the photo is about 1 1/2 times large with much more machining and only took 16 minutes to create.  This being because the CNC machine was cutting at somewhere between 30 and 40 inches a minute.  It was flying!  The other two parts took only six minutes each to create.  I'm still in awe over how fast and beautifully these parts were cut.  The special parts are pieces that I will need to mount a vacuum hose to the CNC machine.  This will keep the cutting table a lot cleaner while parts are being cut.  I'll post photos of that assembly once I get it set up on the machine.


Thursday, September 22, 2011

Let there be color..... silver and black for starters

I got the Makerbot Semi parts painted today and the big model truck reassembled.  Worked out very well if I do say so myself.  I'm looking forward to printing out the rest of the truck when the QC Co-Lab gets the new colored plastic for the Makerbot that we have been waiting weeks for. Or is that months? Ouch!  Just will have to keep my fingers crossed that our order will show up quickly. 


I really like the look of the exhaust stacks.  The black inserts really show off the exhaust guard holes.  Already the model is 10 inches long and stands almost 6 1/2 inches tall even without the wheels on it. It will be much more impressive once I get the cab and sleeper printed out in bright red plastic.  The model will even have a clear windshield and rear window.  That along with a complete interior which will have seats, steering wheel and a bunk in the sleeper.  Stay tuned for future updates.

Makerbot Semi Parts, and Parts, and more Parts!

  Over the past few weeks I've been print parts for my Makerbot Semi at the QC C0-Lab in Davenport. I finally have enough parts to start assembly of the Semi tractor so I thought I would post my progress here to let you see what I've been up to. Here is an image of the tractor what it will look like once it is completed.


Here is the main chassis of the Semi tractor.  Thirty three parts so far and 17 and 1/2 hours of printing.  Needless to say it was not done all at one time.  So you can see why it has taken a number of weeks to complete so far.  This does not include the designing of the Semi. Almost all of the parts will be painted silver for this portion of the Semi.  The fenders at the lower center of the photo have already been painted so I think the rest should look just as good. 

   
This photo is of the underside of the front axle mounts and the frame connector.  Also in the photo you can see the front fenders and fuel tanks.  The frame is joined together in three places using frame connectors (the square piece in the middle of the photo) and small pieces of cylindrical plastic taken off of the print spool that the parts are printed from. Makes a very strong, tight joint.

  Here is a photo of the frame upside down on my computer desk. I'll paint all of the parts before I reassemble the Semi.  It will be much easier than trying to work out the painting with such a detailed model. 

  These parts will make up the exhaust for the Semi.  I'll paint the exhaust guards (the tubes with all the holes in them) silver with a center cylinder being painted black.  The exhaust tip and mount will also be painted silver.  The center cylinder being black should show off the guard nicely.


Here are the exhaust stacks mounted on to the frame.

This is a good shot of the Semi frame sitting without the wheels and again with the exhaust stacks in place. Once the QC Co-Lab gets a new shipment of plastic for the Makerbot I will continue on with this project.  I have to print out the cab of the Semi and the sleeper next. These will be in colored plastic so I won't have to spray paint anything else.  Once these are completed the tires will be the next thing on my to do list.  I will use the one with the heavy tread instead of the smooth tire as pictured above.  I think it will look a lot better with the truck.

Friday, September 16, 2011

Progress with my Makerbot Semi and The Hamilton Tech Student Creative Initiative.

  I've finally got started printing parts for my Makerbot Semi yesterday at the QC Co-Lab in Davenport.  I had spent the previous few days attending a funeral for a family member so the Makerbot Semi was put on hold for a bit.  I was at the Co-Lab all day yesterday printing for a total of five and half hours.  I will take photos of the progress once a few more parts are made.  I want to keep the progression in a logical order otherwise it will not make much sense in the photo sequence. That and the fact that I want to paint the parts all silver for the first portion of the build. I am working on the chassis for the semi tractor and had to correct a modeling omission before I proceeded. I have that corrected now but being as the Makerbot is in Davenport and I am seventy miles from it in Dubuque it will all have to wait till tomorrow when I can spend the entire day once again.  

  I also had to work on a presentation today that I will be giving to the students at Hamilton Technical College in Davenport next week.  Hamilton Tech is starting a new program called the Student Creative Initiative which will encourage students to create a project and Hamilton Tech will foot the bill for it.  I was asked to give a presentation on what I have been creating, dreaming of, and designing to hopefully spark some ideas in the students to get them started on their own projects.  I have ten minutes to talk about projects that I would normally spend a couple hours on.  A tough thing to do but I think I have it pretty well dialed in for the presentation.  Should be interesting no matter what. 

Tuesday, September 13, 2011

My CNC Machine


  I just completed this video/slide show of my CNC machine being put together on my Ipad so here it is for all to see. In the coming months as I have said in a previous entry I will be building another one of these wonderful CNC machines called the "Solsylva".  This was another great project that was far easier to build than I had hoped and I am looking forward to making a lot of different things on this machine. I am still learning on how to run the machine and I will pass along what I learn as I go along. Again keep an eye on my blog here and I will try and keep everyone up to date.

The Tri-Yak Kayak..... My three section fiberglass composite take apart ...


  For those of you who have not already seen my three section kayak here is a video that I put online some time back which shows the boat in sections being put together, and paddling in the water. It will give you a much better idea of how it all works and looks in the water. A great project.

Thursday, September 8, 2011

A 12 Foot Flying Saucer?

Over the past couple of days I've been working on my Makebot flying saucer.  This is a 10 inch diameter 50's style flying saucer that all started because of a discussion I had with a close friend of mine.  He wanted to know if I could design and build a 12 foot flying saucer for his front yard for Halloween.  His wife and I both shouted "A 12 foot flying saucer?".  

It has yet to be built but the idea stuck in my head so I decided to see if I could build a model of the saucer on the Makerbot.  
 The completed saucer pictured here turned out very well on the Makerbot.  The sign next to it is displayed on my IPad so it give you a good idea how large this model is.  Over the following weeks I smoothed out the body of the saucer using fiberglass resin, painted it and found a clear bubble for the top instead of the solid one and even created a complete cockpit with an instrument panel, gauges, control stick and seat.
 
 The photo above will give you a good idea as to how small the cockpit instrument panel is.  The dot on my finger tip is the decal for one of the gauges in the panel.  I had to use a very large magnifying glass in order to cut out the decal from the sheet it was printed on.  All in all it was worth the effort and will be a nice model to display. 
  The saucer is just the first one that has been made and may lead to other variations other than just being a model.  One idea is to use the design as a desk lamp. Other ideas have come up to improve the model by possibly having working light and actual retractable landing gear.  Stay tuned it could happen here in the coming months along with a longer list of improvements.

By the way this is what a 12 foot flying saucer would look like if you were standing next to it.

Sunday, September 4, 2011

Why I Love My 3D Printer by Schuyler St Leger, Ep 86


I saw this video posted online a few months ago which was created last February by Schuyler St. Leger.  A ten year old young man explains better than anyone I have seen thus far on how a Makerbot 3D printer works and what you can do with it. I've posted it again here for those of you who do not know about this wonderful little machine.

Saturday, September 3, 2011

1912 Indian Motorcycle Photo To Drawing and Da Vinci Homer Simpson

Been a pretty busy day today working on converting a 1912 Indian motorcycle racer into a drawing that I can use to do an engraving with my CNC machine.  The drawing was pulled up in Corel software and traced over line by line as you can see below.
 

This is what the rear wheel looked liked after it was traced and the photo was removed.  Starting to look pretty good at this point.
  Next the work continued on to complete the motorcycle as you see below of the photo and the completed drawing.  The hardest part was the engine and all the detail that I put into it.  This was a good day to work on this kind of thing as it has been raining most of the day and that is about the amount of time it took to create the drawing.....all day.


Below is what the complete Indian motorcycle racer looks like as a photograph complete and as a drawing complete.  I will convert the drawing to a Windows Meta File or WMF and then it will be converted again to create the Gcode to run in my CNC machine.  I think it will be a good engraving to make something that is sizable.  I thought possibly that I might add the Indian Head Logo behind the motorcycle.  This would be an easy thing to accomplish with Corel.  Probably will take at least a couple more hours to set it up.  I will have to look into it and see what it will look like.


On another drawing I worked on a few days ago I traced out another Homer Simpson that I want to do an engraving of on my CNC machine.  I call it Da Vinci Homer or what a lot of people are calling it online is Da Vinci's Vitruvian Man - Homer Simpson.  Homer is shown holding a TV remote, a can of Duff bear, a pastry, and a hot dog.  Behind him is a giant doughnut. Again I think this will be a fun engraving to put on a lot of different things. I've already ran a test on Mach 3 and it will take a little over an hour to do the engraving so that's not terribly long.

Friday, September 2, 2011

Welcome to The Tinker's Workshop

Hello Everyone,
  Welcome to my blog site.  I have been working on a lot of different projects over the past couple of years and I thought that it would be a good idea to get this out to the rest of the world.  As you've seen from the opening page I am a retired designer and am still designing, dreaming, and building all kinds of stuff for the fun of it.  I am a member of the Quad City Collaboration and Hackerspace or QC Co-Lab for short and have a lot of fun with the great people there.  We share ideas, projects, stories and each others company so it's always a good time.  In my blog you will find past projects that I have completed, am currently working on, and new ideas that will be future projects.  The CNC machine that you will find photos of under "Completed Projects" was constructed with a good deal of help from the guys at the QC Co-Lab.  They helped me get through all of the electronics work that needed to be done and I built the rest of the machine by hand in my tiny basement workshop.
  In the coming months I plan on building a duplicate of this machine for the QC Co-Lab so that everyone there can have access to such a wonderful tool.  I will document this build as I go along in my blog here so that everyone following my exploits will benefit by what I have already learned and maybe you will be inspired to build your own CNC machine for your workshop.
  Also on the blog are photos of my composite three section kayak that I can easily haul on my Mini Cooper, a cargo trailer for my motorcycle with custom coolers, and a composite recumbent bicycle.  The kayak was a great project and a lot of fun to use also.  I designed and built the kayak from scratch again in my little workshop and it was launched a year ago last July.  The recumbent bicycle also in the completed projects page is a composite fiberglass construction.  I'm still trying to find time to get the tweaking done on the bike but the good news it is rideable and a very unique bike.
  Another section in my blog is the work I have done using Blender 3D software.  This is a 3D animation, render and game software that you can create either pictures or full animations.  Games have been used with the software but with everything I am into I simply have not found the time to check that portion of the software out yet.  Not sure if I ever will.  I enjoy working in Blender as it is a great software to learn and create images of new ideas that come into my head.
  One more section on my blog that I must point you to is the Makerbot 3D printer page.  This is a great little printer that will create 3D objects from your computer files.  I've have just begun to start learning this machine over the past year and hopefully will have one of my own in the next coming year.  It will make a great addition to my CNC machine. 
  So this will give you a little idea of what my blog is about and hopefully you will check it out from time to time to see what new creation I am working on. Again welcome to my site and I hope all your projects turn out the way you've always planned they would.